Table of Contents
In most cases, connecting to the target using its dynamic IP address is straightforward and requires no additional setup. This dynamic IP is typically either assigned by a DHCP server (when the target is connected to a local network) or auto-assigned (when using a single point-to-point Ethernet cable between the computer and the target).
If using a dynamic IP address is not feasible, static IPs can be used as an alternative. To this end, this page presents various scenarios and explains how to configure static IP addresses. While the focus is set on imperix targets, the principles described here apply to any device as these are standard IP networking concepts.
Common issues
In order to be reachable from the computer, imperix controllers require TCP/IP connectivity. Regarding basic addressing, this notably means that the computer’s subnet must encompass the IP address of the target (or adequate routing must be implemented). This naturally happens when both devices are part of the same network with automatically-attributed addresses. However, various problems may cause this to fail:
Within a local network
- No working DHCP server is present. In such a case:
- The target doesn’t receive any dynamic IP address. Therefore, communication cannot take place using it.
- Unless the computer is luckily configured with a static IP address that is already compatible with the controller’s backup static IP address (192.168.x.x / 255.255.0.0), communication cannot take place using the static IP either.
- In both cases, configuring an adequate static IP address should solve the problem.
Within a direct (point-to-point) cable
- An inadequate static address is set on the computer (i.e. an address that doesn’t encompass the target within its subnet). Therefore, the target cannot be reached. Configuring the computer for automatic IP address assignment would be preferable.
- The target firmware is older than 2025.2, in which case Automatic Private IP Addressing (APIPA) is not available. Configuring an adequate static IP address is necessary.
Windows 10
- Navigate to Control Panel > Network and Internet > Network and Sharing Center > from the left pane, Change adapter settings.
- Right-click on the Ethernet adapter that is connected to the target and select Properties.
- Highlight Internet Protocol Version 4 (TCP/IPv4) and click Properties.
- Select Obtain an IP address automatically
Windows 11
- Open the Settings app (
Windows + I). - Go to Network & internet.
- Select Ethernet.
- Select the Ethernet interface connected to the target.
- Make sure the IP assignment is set to Automatic (DHCP).
Windows 10
- Navigate to Control Panel > Network and Internet > Network and Sharing Center > from the left pane, Change adapter settings.
- Right-click on the Ethernet adapter that is connected to the target and select Properties.
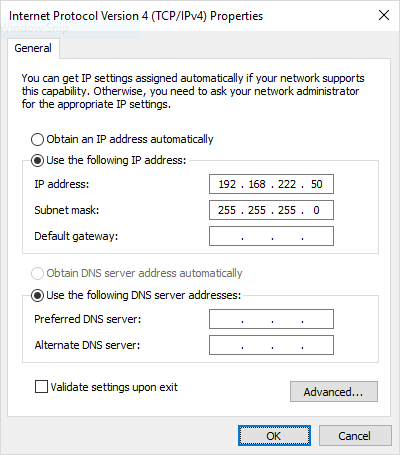
- Highlight Internet Protocol Version 4 (TCP/IPv4) and click Properties.
- Set the IP address and Subnet mask as shown below.
Windows 11
- Open the Settings app (
Windows + I). - Go to Network & internet.
- Select Ethernet.
- Select the Ethernet interface connect to the target.
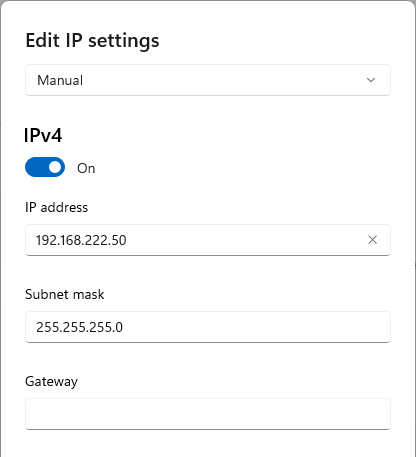
- Under IP assignment, click Edit
- Set the IP address and Subnet mask as shown below.
Advanced network configurations
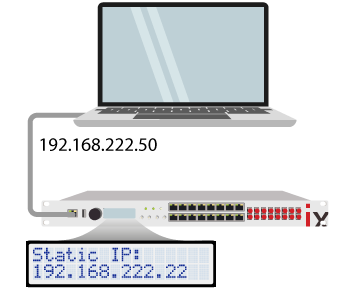
Scenario A: a single target directly connected to the computer
The imperix targets are always accessible using the pre-configured static IP address 192.168.222.22. To connect to it, the Ethernet interface of the host computer must be configured to use a static IP in the same subnet, but different from that of the target. For instance, the Ethernet interface can be configured with the IP 192.168.222.50 with the subnet mask 255.255.255.0.
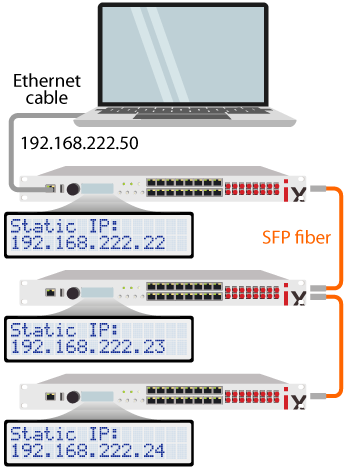
Scenario B: one master-slave system directly connected to the computer
When multiple targets are interconnected in a master-slave configuration using SFP optical fibers, only the Ethernet port of the top master needs to be connected to the host computer. The static IPs of the targets are automatically incremented for each slave:
– Device #0: 192.168.222.22
– Device #1: 192.168.222.23
– Device #2: 192.168.222.24
– Etc.
This configuration requires the same connection procedure as described in scenario A.
Scenario C: multiple targets directly connected to the computer
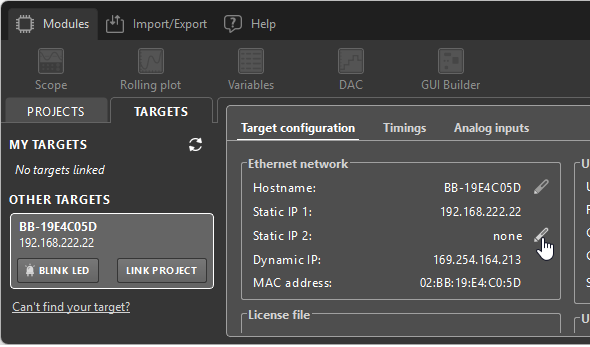
If multiple independent targets are connected directly to the computer, their default static addresses will conflict. Since all targets use the same default IP address (192.168.222.22), the computer cannot distinguish between them, leading to communication errors. To resolve this, each target (including slave devices) must be assigned a second IP address using Cockpit.
- Connect each target, one at a time, to the computer using its default static IP address (see scenario A).
- Open Cockpit.
- Navigate to the Target Configuration window.
- Assign a unique Static IP 2 address to the device.
IP assignment recommendations
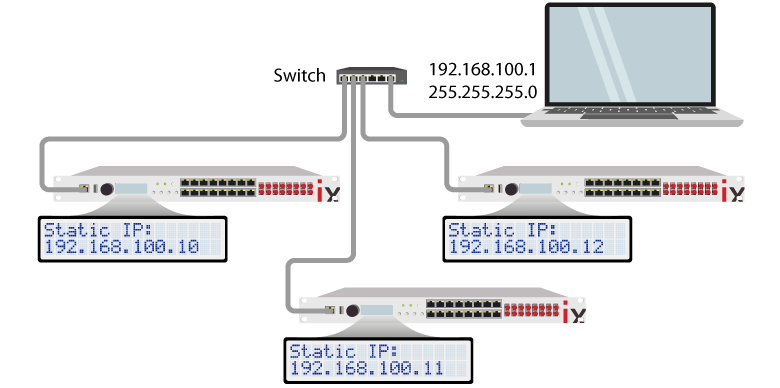
It is recommended to assign Static IP 2 addresses in a different subnet than Static IP 1 to avoid conflicts. For example:
- Target 1: 192.168.100.10
- Target 2: 192.168.100.11
- Target 3: 192.168.100.12
- …and so on
In such as case, the computer’s Ethernet interface must be configured to match the Static IP 2 subnet. For example, set the interface to:
- IP address: 192.168.100.1
- Subnet mask: 255.255.255.0
Once configured, all targets can be connected to the computer simultaneously without IP conflicts.
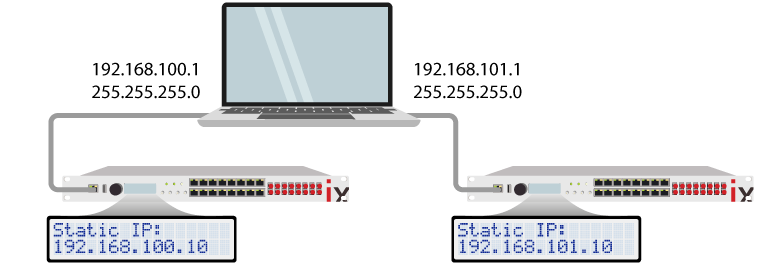
Using multiple Ethernet ports
If multiple Ethernet ports of the same computer are used, each port must be assigned to a different subnet. The targets’ static IP 2 must be updated to match the subnet of the corresponding Ethernet port. For instance:
Port 1:
- IP address: 192.168.100.1
- Subnet mask: 255.255.255.0
- Target IP: 192.168.100.x
Port 2:
- IP address: 192.168.101.1
- Subnet mask: 255.255.255.0
- Target IP: 192.168.101.x